
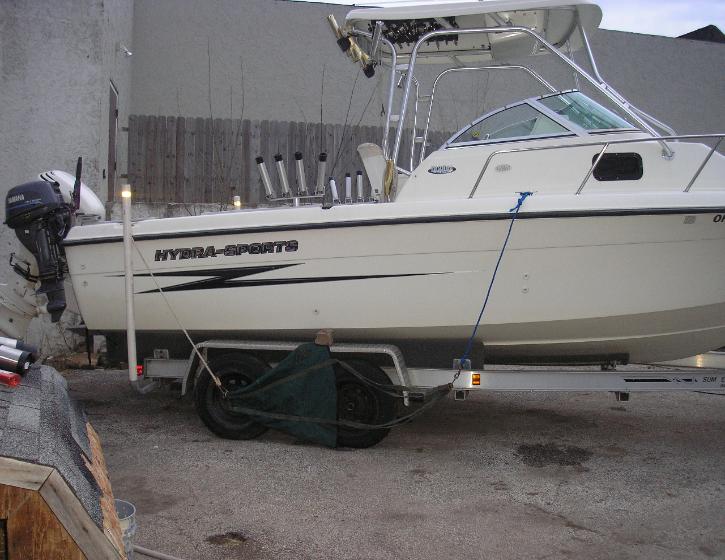
| NIGHT TROLLING FOR WALLEYE Night trolling for walleye can be fun and exciting as long as you learn the basics necessary to become successful at it. Take the time and read all the information provided, it will save a lot of agony and frustration, and will eliminate a lot of those nights when you come home empty handed. The information I provide in here is only very basic, to help build a strong foundation upon which, with more learning from so many others and from your own experience, you will be able to tailor a very successful night trolling technique. PHYSICAL CHARACTERISTICS When it comes to walleye and feeding, there are two important characteristics that one must understand in order to become better at catching them, and they both deal with its eyes. One is the location of the eyes, when you observe the head of a walleye you notice that its eyes are located on the top half and aim forward and upwards. The walleyes use this to their advantage, and they will almost always attack from the bottom-rear of an unsuspecting pray, an angle from which the prey never sees them coming. What's most important to understand is that you always must run your lures above the walleye! Many times at night you will see walleye roll or splash on top of the water. That is a good sign because those are feeding walleyes. As they attack pray near the surface of the water, they grab and roll with it. Whenever you see walleye roll, you always run your lures within the top three feet of the water! This also partially explains what's called "A one-way troll". "A one-way troll" is when you catch walleyes going in one direction and you do not catch them going in the opposite direction. Whenever you notice this phenomenon, you're better off to pickup gear at the end of your troll, speed up to the beginning of your troll line and start again, it will save you valuable time. Second is the tapetum lucidum, which is a layer of reflective pigment covering walleyes' eyes that intensifies any light the retina receives. This provides the walleye with another advantage, it can see very well in low light situations where its pray cannot. Walleyes feed at night because they have the ability to see in low light conditions, where other fish cannot! Where, When and Why? The number one rule in catching walleyes, or any other fish for that matter, is to find them! The body of water that I am referring to is the area that I fish, which is Lake Erie southern shore line from Cleveland to Huron. True you will be able to adopt these same ideas and techniques to many other places. Night trolling is synonymous with in close fishing, within a couple of miles from shore. The two times a year that walleye come in close to shore and you can catch them trolling at night are Spring and Fall. Good locations are everywhere you can find a public boat launch. Since you'll be fishing at night, if you're fishing a location for the first time, it would be wise to be in the water during day light hours and familiarize yourself with the area. Contact local bait shops, the up to date information and advice will be priceless. Look for uneven shore lines, points, small gulfs, rock break walls, river mouths, canals, reefs, sudden changes in shore line, sudden changes in bottom, beaches, warm water discharges from power plants, and so on. Keep in mind that walleyes travel in schools, and that walleye ambush their pray. Waiting around the corner, or in a drop off to attack from, it's not unusual behavior for the walleye, remember it can see much better at night. Jamming its pray against rocky walls, on beaches, or within a golf area, with no way out but back into their hungry mouths is common. Coming up on schools of bait fish congregated at the mouths of rivers, into canals, or discharges, feeding on whatever the current brings their way, is also common. Many major structural changes in as small of an area as possible makes for prime walleye feeding grounds, the more the better. Seeing a long stretch of shoreline, mostly unchanged, will probably not be a good area to find them all the time! It is very important to accept and understand that a fishing season will have its ups and downs, good and bad nights throughout its duration. My motto is: "You can learn how to catch fish when you're catching fish!" When you're out there one night and catch fish left and right, try something different. Put another lure out that you know for sure will not catch and also put another one out that you know it will also catch, see what happens. I guarantee you that the learning you will get from doing this will help you many times when the walleyes will not be so cooperative. Through learning, experience, and know-how you will be able to become more consistent, and be able to catch walleyes even when the bite is tough. The Spring night season normally begins around the second week of April and lasts to mid to the end of June. After the walleye spawn, they stay close to shore where the bait fish are still more abundant. This period is called the post-spawn, when the walleyes feed heavy to recuperate from the spawning. The spring season will start any time during the first half of April, and this is when the big spawned out females are being caught. As the spring season progresses through May, you will begin to catch a mixed size of walleyes, and it can extend well into June, rarely even into July. In our area, a good indicator that the Spring season is drawing to an end is when you begin to catch sheaphead while night trolling for walleyes. Once this happens, within a few weeks the walleye will be gone out to deeper waters. The Fall night season normally begins mid to end of October and ends around Christmas. At times it can go as long as into January under the right conditions. Some years, though more rare, the fall season can start as early as September, or it may not happen at all. The fall season depends very much if the walleyes follow the bait fish all the way into shore, or if enough bait fish remain out in the open water so that the walleyes don't need to come in close to feed. Most likely than not, the Fall season will happen. In the Fall the walleyes follow the bait fish, and their main objective is to eat. The walleye eats to store and get fat for the winter months. No, they do not go into hibernation during the winter, but because they are cold blooded animals, the very cold water slows them down considerably, making it more difficult for them to chase bait. By end of November to mid December, after the walleye ate heavy for over a month, and in addition the eggs in the females, it is the best time of the year to catch a real monster, trophy walleyes! More then one way to catch them. One fun, inexpensive way to catch walleyes during these times is to cast from shore. I've cast for them for many years, and still do. A good set up that works for me well is: 7' to 8' fast action rod, as light as possible. 2000 to 2500 size spinning reel, the reason being is that you can spool them up twice from a standard size spool of line you'd purchase from the store. 6 to 10 pound test mono filament fishing line, braided line works also yet you have to make sure your rod guides are strong enough so they don't get cut by it. Best baits are the long-shaped shallow diving crank baits in floating and suspending versions. Rattle Trap style baits also work at times. Same principles as mentioned above will work well on picking a prime location; break-walls, rock, piers, beaches, etc. Another way to catch walleyes is to troll for them. This can get as expensive as you let it, but it can be much more productive then casting from shore. Trolling gear Proper equipment to use for night trolling consists of 8' medium/heavy action trolling rod with line counter reels. Line counters are important because the depth the crank baits run at depends on how much line you leave out. 10-12 pound test mono filament fishing line or 10 pond diameter braided line. When using the braided line, is better to run 3 to 6 foot leaders. A leader is the length of mono filament fishing line attached from the end swivel snap of your rod line. I make my leader with a swivel snap at one end and a straight snap at the other. The reason is that it's better to attach a crank bait to the fishing line with a straight snap, while a spoon or a harness with a swivel snap. So instead of making two sets of leaders, as I used to, one with swivel and swivel snap at the ends and another with swivel and straight snap at the ends, I started making one with straight snap and swivels snap at the ends. This way, I just flip the around, depending what I'm running! In-line trolling boards if you plan to run multiple lines, the larger 9" - 10" boards are more suitable. Some type of illuminating device for each one of your boards: Glow sticks, battery operated glow sticks, lighted bobber, all work with a little ingenuity to attach them to the boards. Plenty of crank baits, in many different colors and sizes! Two ways to troll at night for walleyes One way to troll at night is flat-lining. When you flat line, you let out as much line as you desires and you troll your lines straight behind the boat. Remember, the depth your baits will run at depends on how much line you leave out, the more line you let out the deeper your baits will run. You can either hold the rods in your hand or place them in a rod holder, in this case the rod holders should be set more horizontal to the water line. Flat-lining limits you to only two rods, one on each side of the boat, maybe three if you run one straight behind the back of the boat, but the more rods you run this way the more tangles you'll have, I strongly recommend using no more than three rods. This way of trolling can be very productive, and most convenient when you fish alone. Second way to troll at night is to use in-line boards. The in-line boards spread the lines to the side and gives you the ability to run two, three, even four lines on each side of the boat. Setting up the boat. Because the walleyes are in so close during the spring and fall seasons, most of the time you can catch them right against the shoreline, any safe-size boat will work. Of course, take into account wave conditions in relation to the boat, but there should be plenty fishing days for any boat during the four to five months that the Spring and Fall seasons have to offer. Any method of propulsion will work, outboards, I/O, electric, and it will not have a terrible effect on your catch success. This is my 23' Hydra Sports, that I use for charters. Refer to the picture as I will talk about set-ups. Speed and Trolling Bags. Speed is so crucial when trolling at night for walleyes that going just 0.2 mph too fast or too slow will mean the difference between catching or not catching, and is relevant to water temperature. At the beginning of April when walleye spring season gets on the way, the water temperature is in the 40's, at this time the optimal trolling speed is between 1.00 to 1.50 mph. As the water temperature increases to high 40's to mid 50 degrees, the optimal trolling speed is 1.50 to 2.00 mph. By the end of the season, when the water temperature gets in the 60's, trolling for walleyes will require trolling speeds of up to 2.50 mph, and at times slightly higher. In the fall, By the end of October, the water temperature is again in the 60's, and you begin the fall walleye season with trolling speeds of about 2.00 mph. Using the same rule of thumb, as the water temperature decreases, so will the optimal trolling speed. When the walleye fall season extends into January when the water temperature is in the high 30's, the trolling speed necessary to catch walleyes could be as slow as 0.50 mph. Trolling speed is so important, that it could mean the difference between catching 20 to 30 walleyes a night or catching only two or three. With this being said, the necessity of a trolling bag as part of your equipment is imperative. Depending on the size of the boat and means of propulsion, trolling bags will be necessary to attain the slow trolling speeds required to catch walleyes. Run the trolling bag along the side of the boat. Attach a rope from the rear of the trolling bag to the rear boat cleat, and from the front straps to the medial boat cleat. Size the ropes so the bag runs completely submerged just under the water surface, about half way between the two cleats, and not too snug against the boat. Pay attention to the rear rope so is not two short causing the tail end of the trolling bag to be pulled upward, better off slightly longer then shorter, for this will tend to empty the trolling bag. Attach both ropes to the cleats before putting the trolling bag in the water. Lift the bag out of the water by the rear rope to remove from the water. Trolling bags can also assist in boat handling and control. For smaller boats it can help with the rocking, it can also help the boat to stay straighter. In windy conditions, using the bags allows you to speed up your motor while still maintaining the desired speed, giving you more torque needed to steer the boat against the wind. Trolling bags come in several sizes, length wise, from 18" to 36" in different increments depending on manufacturer. Rule of thumb to figure out the proper size trolling bag for the boat is to consider 1" of trolling bag length for every 1' of boat length. When an exact match cannot be obtain, better to go larger then smaller, for a 22' boat get a 24" trolling bag instead of a 20" bag. Rod Holders. A good quality rod holder should be able to be adjusted quick, easy, and in every possible direction with as few tools as possible, no tools is the ideal choice. The more tools needed for adjustment, the more hassles a rod holder will be. The more settings it can be adjusted on, the more versatile its uses. When flat-lining, the rod holders should be placed towards the rear of the boat and set horizontally to the water. Having the rods horizontal to the water will increase the space between the two lines, and it will avoid catching your line in the prop. When using in-line boards, the proper way to set them is more vertical, upright, so that the rods will stay in a more vertical position, they can be tilted outward from the boat to up to about 20 degrees. This is important when you run in-line boards. There has to be enough clearance between the rod holders so the reels don't catch to each other. Place the rod holders for the in-line boards more towards the midway of the boat, to keep the rear and as much of the sides of the boat clear for netting the fish, don't worry about the trolling bags, they will be tucked against the boat, out of the way enough not to cause any problems. This setup can be applied to any size boat. A Kicker? If your boat is equipped with a large horsepower motor, it might be a good idea to run a kicker motor for trolling purposes. One of the advantages is lower gas consumption and ability to slow down better. Also if you are running a two-stroke for the big motor as I do, not having to deal with the fumes will be greatly appreciated. An Autopilot and GPS? YES, it's definitely worth it! Maintaining your course is much easier with the autopilot. Knowing your speed is CRUCIAL, and being able to come back on the fish is a MUST! Fish-Finders? A good fish finder with water speed and temperature is irreplaceable. You need to know the water temperature, the depth the fish are at, and your Water Speed. Although, most of the time you will guide your speed according to your GPS, many times when you run with a current, your water speed will be close to zero. This means you are not moving in relation to the water. In this case you will only "float" your baits, instead of dragging them through the water as they should be. You are using the boat to pull your baits through the water, versus casting and retrieving when you have a "feel" on how your bait is behaving. The only clue you have about how your baits are really moving is the correlation between your GPS speed (your speed in relation to the ground) and your water speed (your speed in relation to the water). Understanding and being able to work with this concept will be crucial in your success at trolling. A good way to learn this is to go to a river where there's a fair visible current. Cast down stream and you'll see that you need a much slower retrieve to "make the lure work" upstream against the current then to "make it work" down stream, with the current. The Weapons! When it comes to choosing the right cranks, the best choice is the longer shape style crank baits. There are many crank bait manufactures, some real good and some worthless. Color of the lure used plays a very important role! YES, COLOR IS VERY IMPORTANT! There are many theories on how to chose to right color according to certain conditions. Although the concepts are logical and many times they do work, I had it many times when the opposite held true. Yes, color is important, but is useless on its own. To be successful one has to consider and take into account all the other important factors, like: 1-location (you can't catch fish that are not there),2-trolling speed, 3-running depth, 4-water condition, 5-bait (size, shape, sheen, flash not just color, color), 6-trolling direction, 7-currents (correlation between ground speed and water speed). I've listed these factors in "order of importance", not to say that one is much,much more important then the other. But to emphasize an order of thinking that can be used when planning and working with a trolling program. The more consideration you give to all the factors, the more successful you'll be at it! Shallow diving crank baits are the best choice for this type of fishing. Some can dive up to 8-9 feet depending on how much line you leave out. Most of the time you want to run your baits no more then 5 feet deep at most, and as shallow as within one foot from the surface. You'll see the walleye roll with your bait as it takes it! These shallow diving cranks come in three different styles: 1. Count Downs - The crank will slowly sink all the way to the bottom, 2. Suspending - the crank will slowly sink to a certain depth, 2 to 5 feet depending on the make, then just suspend there in the water column, 3. Floating - the crank will float to the surface of the water. It is very important to know what type of crank you have and want to use! The floating and suspending types are the two to consider when trolling, and the choice is dependant on the water temperature. A floating crank floats on top of the water, it needs a certain speed to be dragged at so it will "dig in", "work", and "swim" through the water. If pulled too slow, it will only flop and float on top without much effect. When the water is warm enough that a "good" trolling speed is about 1.5 mph and higher, a floater is the ideal choice. When fishing cooler water, with trolling speeds bellow around 1.5 mph, then the better choice would be a suspending lure. A suspending crank suspends within the water column, and does not need to be pulled for it to be effective. As it suspends, it mimics a bait fish suspended in the water, as they often are. The colder the water, the less a walleye will chase the bait, a slow moving, suspending bait fish will be a prime target for them. Many times when fishing cold water from the rocks, the best way to trigger a strike would be to cast a suspending crank, then just leave it suspend with just enough tension in the line to fill the 'bump", not even reeling in. You can turn a good floating crank into a good suspending one by attaching small split-ring weights to the hook shaft. Doing it yourself this way, gives you the ability to control how deep and which way your lure will suspend. Different manufactures have different suspending depths for their lures, and some are made to suspend heads-up, or heads-down. Unfortunately, if you take several of the exact same suspending lure by the same manufacturer and put them in a bucket of water, you'll be in for an unpleasant surprise! Not all will suspend the same, and some will actually float to the top! These again are more factors to consider, and yes they are important enough to make a difference at one time or another. The more you are in control and know exactly what your lures are doing, the more you can use these factors to your advantage. Just like perching: at times the only thing that works is live minnow, other times they will only bite if you hook the minnow by the tail, and at other times if you only hook it through the lips, many times nothing matters because they're biting like crazy, yet once in a while nothing matters because you couldn't buy a bite! The count downs are used some when casting from shore, but rarely used when trolling. Deep diving crank baits are used when targeting deeper running depth, some can dive up to more then 25 feet. Though rarely used for the night trolling discussed here, they can be used to a certain extend with real good results. One way is to use them with very short leads (amount of line left out, to attain certain running depth) behind the boards, as short as 7 feet and no more then 25 feet. The way I use them with great results is to flat-line them on the side of the boat. Take the rod holder that's furthest towards the rear of the boat, set it down horizontal to the water line, leave out 25 feet of line with a deep diving crank bait, set it in the rod holder, and loosen the drag because it will catch fish! Setting it this way should not get in the way of your in-line boards as you reel in fish with them How to target and pinpoint what works! Once you chose a location, and your fish finder shows fish, you're ready to put together a plan. But before you do take into consideration all the information available to you: water temperature, water color, existing structures, and so on. Decide of an area to fish, color and type of bait to use, and what speed to troll at. "Precision Trolling" Is a book that gives you the diving curve for many of the crank baits, shallow and deep divers. 10 pound diameter line is the one mostly used to gauge the running depth of the lure, so you'll have to run lines close to that diameter, a 25 pound diameter line will vary greatly in comparison to the books charts. I personally use 30 pound braid with 10 pound diameter for that same reason. The book can be found at many tackle shops, and are a very valuable tool. As mentioned before, the depth your lure will run at depends on how much line you leave out, more line means deeper. I run 3 foot mono leaders with my braided line, and I do take it into account when I measure how much line I leave out. When doing this type of fishing, you will want to fun your baits no more then 5 feet deep. This means that you will not need more then 40-50 feet of line out with most of the cranks used. Many times the fish will feed within the to one foot of water, and if you run your baits at 2 feet deep, you might not catch a whole lot, it is that important. It is also important to understand that it makes a big difference between running at 15 feet back or 25 feet back, and that difference can mean catching or not. In-line trolling boards attach to each one of your lines. They take the lines to the side of the boat making it possible to run more lines and cover more water. When night trolling, I can run 4 lines on each side, plus the two flat lines with the deep divers. This is possible because of the shorter leads ( amount of line from the board to the lure) I need to run, less then 50 feet and many times 10 or 15 feet. The shorter the leads the easier it is to run more lines. Part of the problem here is that most of the in-lines are designed to stay on the line when you have a fish on, some use a flag system that drops when you have a fish on, but most time you can tell there's a fish on because the board will "drop back". This means that if you have other lines with boards in the water, between the rod with the fish and the boat, you'll have to work the board with the fish back and around the inside boards, then once the fish gets behind the boat you reel in till the board gets to the boat, remove the board, the reel in the fish. This can be difficult when running leads more then 50 feet long, as is when day fishing with deep divers and 150 feet leads. The line attach to the board in front and rear of the board. Every manufacturer has some type of a clip for the front attachment, the difference is in the rear type of attaching the line. The type of rear attachment that is the quickest to release are best. One thing to watch for are boards that have clips for both front and rear, I've seen may lose their boards when a fish was on because both clips released before the board made it to the boat. A way to fix this problem is to add a snap swivel to the ring the rear clip is attached to or replace the clip with the swivel. Attach the snap swivel to the line, with or without the rear clip, this will eliminate loosing the board but it can make it more difficult in removing it. Many manufactures are redesigning their boards so the front clips will release the line when a fish is on, and use rear snap swivels instead of clips. I've changed my front clips to release clips a couple of years ago for the same reason, I made my boards to snap and slide. In this case, when a fish hits, the front clip releases and the board slides down the line. This allows the fish to "drag" back quicker and it makes it easier to work the it back and around the inside boards. When using this type of boards it is a good idea to add a 1/4" bead on your line before your end swivel snap, this will stop the board from sliding down to the fish which could knock it off. I also use only a 3 foot short leader instead of a longer one, this way when I see the board I know the fish is 3 feet behind. Being that you fish at night, trying to make out where the fish is when using 5 feet plus leader can be difficult. Lighting the in-line boards. One important thing to remember is to use a light that is visible all around, 360 degrees. Many times there will be others fishing around you. They will need to see your boards as much as you, tangling boards with others is nothing fun! Many manufactures make their own lights, avoid the ones not visible all around, that are too heavy or that mount to high from the boards. This will raise the center of gravity of the boards and cause them to tilt. The Most efficient way I found for board lights is to use battery operated glow sticks. They can be turned on and off which will extend the time of use making it very cost effective. Strap them flat, on top of the board with heavy duty rubber bands (check and change the rubber bands often). Best colors are green and red, much easier to see. The first ones I found could not be opened to change the batteries, but I found some lately that can. The big draw back is that they take water on both ends, end the best way to fix this is to have then in a zip-lock bag. 40 - 30 - 20 - 10 |

| The Basics of Night Trolling for Walleyes |

| |
| |
| |
| |
| |
| |
| |
| |
| |